> For the complete documentation index, see [llms.txt](https://docs.valtimo.nl/llms.txt). Markdown versions of documentation pages are available by appending `.md` to page URLs; this page is available as [Markdown](https://docs.valtimo.nl/valtimo-docs-v3/features/iko/tabs.md).
# Tabs
Organize detail screen information into logical groups using tabs.
## Overview
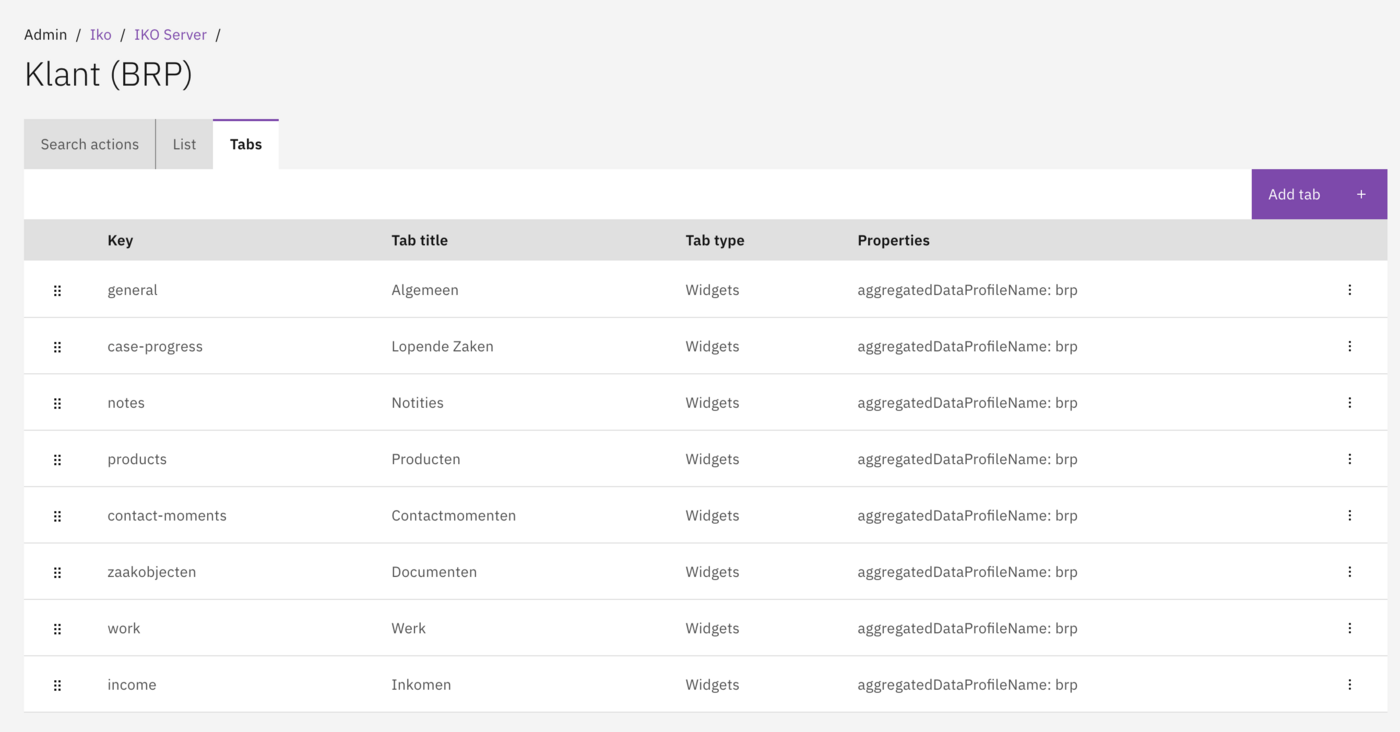
Tabs organize the information on the IKO detail screen into logical groups. Each tab contains one or more widgets that display the actual data. When a user opens a customer or object detail screen, they can navigate between tabs to view different categories of information.
### Examples of tabs
* General.
* Running Cases.
* Notes.
* Products.
* Contact Moments.
* Documents.
* Work.
* Income.
## Configuration
### Creating a tab
1. Navigate to **Admin → IKO**.
2. Select an IKO Server and View.
3. Go to the **Tabs** section.
4. Click **Add Tab**.
5. Configure the tab name.
6. Add widgets to the tab.
Tabs configured for a View.
{% hint style="info" %}
The order of tabs can be adjusted via drag & drop.
{% endhint %}
Tabs displayed on the detail screen.
## Tab properties
| Field | Description |
| ---------------------------- | ------------------------------------------------------------------------------------------------------------- |
| Key | Technical key (unique identifier). |
| Title | Display name of the tab. |
| Type | Tab type (only `widgets` is supported). |
| Layout algorithm | How the tab's widgets are arranged. See [Layout algorithm](#layout-algorithm). |
| Aggregated Data Profile Name | Name of the data profile for aggregation. If not specified, data from the connector endpoint is used instead. |
## Layout algorithm
The way a tab's widgets are arranged can be chosen per tab. The same options are available for dashboards and case widget tabs.
| Selector label | Stored value (`widgetLayout`) | Behaviour |
| ------------------- | ----------------------------- | -------------------------------------------------------------------------------------------------------------------------------------------- |
| Default (less gaps) | `MUURI_GAP_FREE` | Muuri masonry that fills small gaps. Keeps the widgets in their configured order as much as possible. **Used when nothing is configured.** |
| Default | `MUURI` | Plain Muuri masonry without gap filling. Keeps the configured order, but empty gaps can remain. |
| Gap free | `BEAUTIFUL` | Custom dense-packing algorithm. May reorder widgets within a section to remove gaps and almost always produces a clean layout without holes. |
**Trade-off:** *Default* and *Default (less gaps)* keep the widgets in the order you configured but can leave empty space, while *Gap free* reorders widgets to eliminate gaps at the cost of changing their order.
* **Via UI:** open the **Add Tab** / edit tab modal and pick an option in the **Layout algorithm** dropdown. An information block underneath the dropdown summarises the trade-off.
* **Via auto-deployment:** add the optional `widgetLayout` property (one of the stored values above) to the tab in the `*.iko-tab.json` file. When omitted, the layout falls back to `MUURI_GAP_FREE`.
## Tab contents
Each Tab contains one or more Widgets. See [Widgets](/valtimo-docs-v3/features/iko/widgets.md) for detailed configuration options.
## Related
* [Views](/valtimo-docs-v3/features/iko/views.md)
* [Widgets](/valtimo-docs-v3/features/iko/widgets.md)